
Wednesday, January 11, 2006
Preliminaries
You may work in pairs for this classwork and for any homework/lab assignments of this semester, unless I specifically say otherwise. If you do so, be sure to put both your names in the header comment of every source code file you turn in.
Don't worry if you don't finish all these exercises today -- we will continue on it tomorrow during lab. If you get stuck on any steps involving the CS file server, you may consult with other students who were in my course last semester.
When I indicate file or folder names to create, be sure to copy them exactly, including upper/lowercase distinctions. And most of the time, avoid having file names with spaces in them since some operating systems (like Windows) may have trouble with them.
1. Logging onto the CS file server
(Note: The server will hopefully be undergoing an operating system update in the first two weeks of classes, so we may need to deal with some downtime at some point. Also, in the update, all the passwords will be reset so you will have to go through the procedure below again to change your password.)
You will store your work for this course on our CS server. We will be accessing the server machine in a couple of ways. Mainly, you will use it to store files which you work on for labs and homeworks. Then you will also use the server to submit your completed assignments.
First, from the "Start" menu in Windows, choose "Run...". In the dialog box, type "\\csserve". After a short pause, a box will pop up asking for a username and password. For the login/user name use your Berry email username. (If you used this server last year, use the same password from last year.) For the password, type your 6 digit student ID number (you will change this password later). Click "OK". After this, a window will open up like:
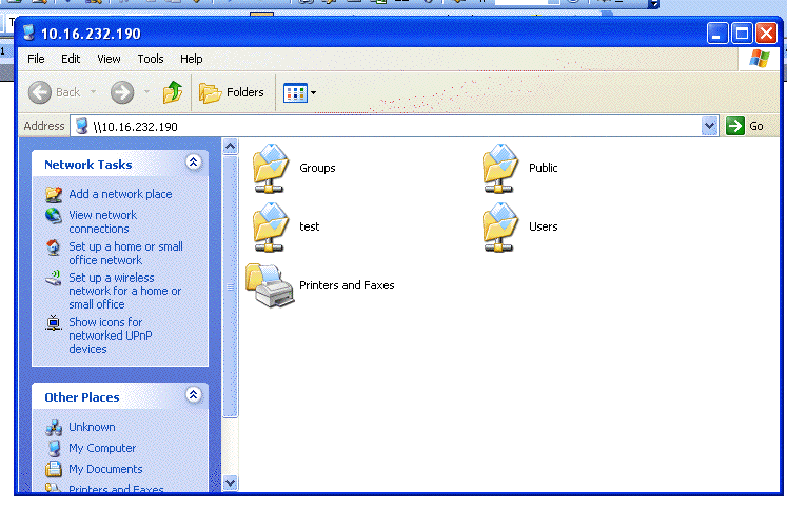
Open the "Public" directory by double-clicking on it. You should see a web page file in there labeled "policy.html". Open it and read it (it's short and sweet).
- Send me an email saying you have read and understood the csserve policy.
Go back to the outer directory. You should see a folder in there with the same name as your login name. In the example above it is called "test". Open that folder. This is your private storage space on the server. Open the "Documents" folder within your private folder. Create a new folder called "csc121" in your private Documents folder. This is where you should store your work for this class.
2. Writing and running Java programs using the Eclipse IDE
For this course, you will use the Eclipse IDE ('Integrated Development Environment') to write, compile, run, and test your Java programs. Eclipse is similar to other IDEs that are widely used in the "real world." Because of this, there are many features of Eclipse that you will probably not use for this course, but feel free to experiment with it and read the help documentation for more information.
Follow these steps to write your first program in Eclipse.
Start the Eclipse program: you may find an icon on the desktop, or it may be listed in the Programs under the Start menu. Once Eclipse starts, close the "Welcome" window, if one appears. Notice the "Help" menu on the menu bar -- when you have some time, it would be a good idea to browse the help documentation and become familiar with how to find help using it.
In this step, we'll set up the Eclipse workspace which is the place where Eclipse will store your files. Choose File -> Switch Workspace (that means, from the "File" menu, select the "Switch Workspace" option.) Browse to the "csc121" folder that you created in your private Documents and press the "Choose" button.
Get familiar with the layout of the Eclipse screen. On the left will be listed the "Package Explorer" -- every programming assignment you work on will be stored in its own package within your workspace (a Java "package" essentially corresponds to a subdirectory in your "csc121" directory).
In your workspace, start a new project for this weeks lab. Go to File -> New -> Project.... Choose "Java Project" and click "Next". Enter the project name: "lab01". Choose the "Create new project in workspace" option. Click the "Finish" button.
Now create a HelloWorld class: Select File -> New -> Class... (or right-click on the "lab01" icon and select New -> Class...). Enter "HelloWorld" for the class name. Under the method stubs option, make sure "public static void main(String[] args)" is selected. Click "Finish". Notice where the new file has been created in the Package Explorer. Fill in the body of the HelloWorld class as follows:
   import java.util.Scanner;

   ...

   public static void main( String[] args ) {
      System.out.println( "Hello, World!" );
      Scanner in = new Scanner( System.in );
      System.out.println( "What's your name?" );
      String name = in.nextLine();
      System.out.println( "Hello " + name );
   }
To run the program (Eclipse automatically compiles files when you save them), right click on the class name and choose Run As -> Java Application.
The output should appear in the "Console" view at the bottom of the window. To provide input to the Scanner, click in the "Console" view and type your name there.
Try introducing some syntax errors into the program and see what happens. Check the "Problems" view at the bottom of the window.
At the bottom of the window you will see a number of possible "views". For example, click on the "Tasks" view if it is not already visible. If you do not see the "Tasks" view at all, choose Window -> Show View -> Other... and look under the "Basic" list. This is useful if you close a view that you need by mistake. You can maximize/minimize views using the buttons on the right side of the view bar.
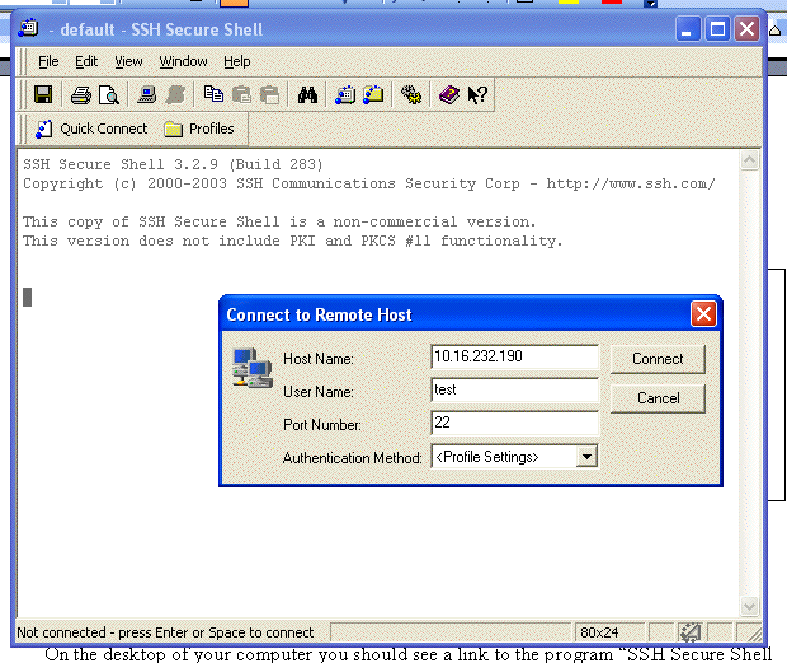
3. Accessing the server via terminal login and changing your password
Here we will learn how to access the server machine in order to run commands and programs on it. You will be interacting with the server through a terminal (text-based) interface. The server is running Macintosh OS X, which is essentially a Unix-based operating system.
On the desktop of your computer (or in the "Start" -> "Programs" menu) you should see a link to the program "SSH Secure Shell Client." Launch that program by double clicking on it. You will get a window like the one below. Click on the "Quick Connect" button. Type in the host name: "csserve.berry.edu" and type in your login name as the user name. Click "Connect" and it will ask you for your password (your student ID number unless you changed it already). If you want to save the host and login name information as a profile, call it "csserve-yourloginname" (but it will only be saved on the particular machine you are working on).
You should now see a terminal (text-only) screen with a prompt like:
Welcome to Darwin!
CSServe:~ test$
Type "ls" and press enter. ("ls" in Unix is like "dir" in the Windows/DOS terminal). You should see a list of the directories (folders) that were in your private folder when you opened it in one of the earlier steps of this lab. Type "cd Documents" and press Enter. (Unix is more picky about upper and lower-case than Windows. In this version of the operating system, it might actually be kind enough to do what you want if you type "cd documents" with a lower-case d, but in general you have to be careful with Unix-like systems.)
Type "cd csc121" and then Enter. Type "ls" and press Enter. You should see the "lab01" directory you created earlier. Type "cd lab01" and "ls" again. The "HelloWorld.java" file that you edited in the previous step should be in this directory (use the ls command to check it).
Type "passwd". This will run a program that allows you to change your password. First it will ask you to type your old password and then your new password twice.
4. Submitting Completed Programs
In order to submit your completed programs for grading, you need to log into the server as in step 1 and copy your files into the proper submission directory for the assignment. From the CS server (\\csserve) folder, open the "Groups" directory. You should see a "csc121_06spr" directory - open it. In there you will see one or more directories labeled by assignment numbers (for example, "submit01"). To submit your work for assignment/lab 1, you would open the "submit01" directory, find the subdirectory with your login name, and copy the necessary files into that folder.
Always make sure that you only submit source code files - ending with the ".java" extension on their name, not files ending with ".class" (which are the compiled Java bytecode files that are generally not readable by a human).
To try this out, copy the "HelloWorld.java" file you had earlier edited into the submission directory. (Be sure to copy the file, not move it - you might have to hold down the 'Ctrl' key on the keyboard while dragging the file to make sure that it copies the file from your hw01/src directory to the submit01 directory. Let me know when you've done this so I can check and make sure the file was properly copied in.
Lab Work
Once you have finished the above steps, start working on tomorrow's lab: Lab #1. Try to complete as much as you can during the class period but don't worry if you don't get very far.